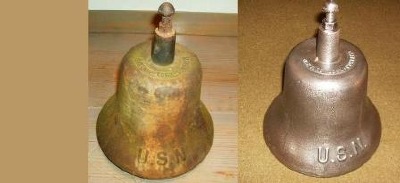
Electrolysis is one of the least destructive and most thorough ways to remove rust because it doesn't damage the base metal. As electricity moves through a sodium carbonate bath, a chemical reaction takes place, separating the rust from the metal. We cleaned the bell shown above by electrolysis. As you can see, it was in pretty bad shape when we got it, with the clacker and interior showing significant pitting. Of course, the "after" pic didn't come out of an electrolysis bath looking that way. It still takes a little elbow grease to achieve a quality end product, but not nearly as much as doing it all by hand. It may sound complicated, but it's really quite easy. Click the links below for alternate views, then continue reading to get started!
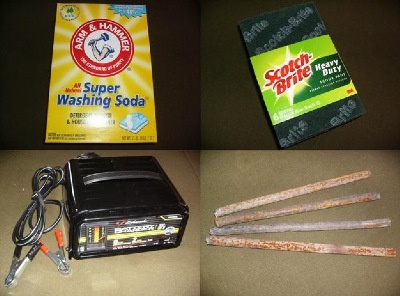
- sodium carbonate to act as a catalyst for the electrolytes (Arm & Hammer washing soda works)
- a nonmetallic finishing pad (we use Scotch-Brite)
- a battery charger (2 amp. min.) with an ammeter
- "sacrificial" steel to serve as an annode for the positive lead (if you use more than one annode, you'll need copper wire to connect them to complete the circuit)
You'll also need a nonconductive container to hold the item you want to clean and a piece of steel to connect to the tool to serve as the cathode for the negative lead.
Start by attaching the annode(s) to the nonconductive container. Depending on what you're cleaning, the setup can be quite elaborate. If you use multiple annodes, you'll need to connect them with copper
wire to complete the circuit. To ensure proper contact, wire
connectors work best, but you can use clamps in a pinch. For a closer
look, click here.
Ideally,
the container should be large enough to completely submerge the tool you're cleaning. Any part that isn't submerged will remain unaffected. The tool is the cathode, which will receive the negative lead
from the battery charger. However, you'll need a dry contact point on
the cathode. Here, we simply affixed an eye-bolt to the tool.
Next, cover the item with water, adding one tablespoon of sodium carbonate
per gallon of water. Mix until sodium carbonate is dissolved. Finally,
connect the positive lead (red) from the battery charger to the annode
and the negative lead (black) to the cathode.
Once everything is connected, plug in the battery
charger. You'll immediately know the process is working if you see tiny bubbles
rising from the tool. In this pic, the bubbles are prominent at the
three main corners (click here for a better view). When the bubbles stop, the process is complete. It can take from one hour to multiple hours to clean an item depending on its
condition and the result sought. For a thorough cleaning, you should turn the item over at some point; otherwise, the parts of the
tool resting on the container won't get cleaned.
Note how "clean" the annodes are in the above pic. As the
process continues and they accept more electrodes, a chemical reaction
occurs and they begin to take on a green, cakey appearance. To maintain optimal conductivity, occasionally clean
the annodes. A wooden paint stirrer works great. Remember not to
use anything metal. The water is electrically charged.
This is the result after only one hour. (Click here for a closer look.) It's pretty nasty-looking stuff. In fact, it is
nasty stuff. The process produces
hydrogen gas (think the Hindenburg), which is flammable and highly explosives, so you'll want to be sure you do it
outdoors or in a well-ventilated area.
Another benefit to
electrolysis (besides being effective and nonabrasive) is it's
relatively inexpensive. In this pic, the "rust" particles seen floating on the surface
will settle once the charge is removed from the water. That
means you can use the water again.
The tool will appear black when you remove it from the
water. The "black" is actually ionized oxidation and can be removed easily.
Simply wipe down the item with Scotch-Brite pads and warm soapy water. This is a critical step in the process because it helps prevent flash
rusting, which occurs when moisture on the metal reacts with oxygen.
Flash rusting is more likely to occur on high-humidity days. However,
it's important to note that once the iron oxidation is removed and
the tool is dry, you may think the process didn't work.
We recently cleaned up an old barn trolley using electrolysis. Because it was a fall day with virtually no humidity, we hosed down the parts afterward. The pic at left shows what they looked like. While the rust is gone, the dust from the rust remains. If you look at the two wheels in the bottom corner, you can see the difference after the rust is removed. To enlarge the pic, click here.
Scroll down to see the results of the project we started at the top of the page.
The item we used (from a plow) had a sufficient amount of rust on it, though the bottom was far worse than the top.
So here's the finished product, which took several hours but was
virtually effortless and a pretty neat learning experience. This is a picture of the
bottom of the tool we cleaned. It was taken immediately after being
washed down. To enlarge, click here.
It's worth noting that unlike the barn trolley pictured above, this piece is relatively flat, so the "post-cleaning" wasn't as difficult. What you use to remove the dust depends on what you're cleaning. On
softer metals or heirlooms, stay away from a wire wheel or wire brush.
Of course, you may find that a wire wheel is appropriate for some steel
items. Other items (e.g., screws) are so small that it's easier to take a
polishing wheel or wire wheel to them. Of course, you'll need to hold them with something
to do it safely. We use small vise grips or pliers. Because this item was flat, wiping it down with a wet cloth was sufficient.
This is a top view after the item was dried and received a coat of
Howard's Feed & Wax (a great sealant/rust deterrent). Whatever your
plans, be sure you execute them as quickly as possible after completing
the process. The quicker you react, the less likely it is that rust will
form on your item. For a closer look at this pic, click here.
If you have questions about electrolysis, feel free to send them to us at info@busenrestoration.com and we'll do our best to answer them.


 - sodium carbonate to act as a catalyst for the electrolytes (Arm & Hammer washing soda works)
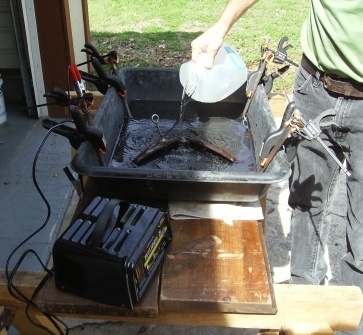 Start by attaching the annode(s) to the nonconductive container. Depending on what you're cleaning, the setup can be quite
 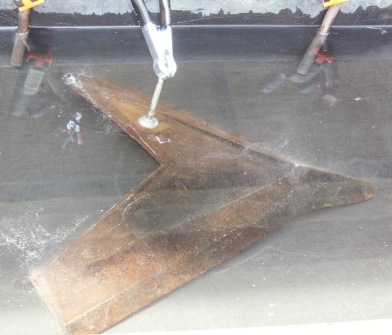 Once everything is connected, plug in the battery
charger. You'll immediately know the process is working if you see tiny bubbles
rising from the tool. In this pic, the bubbles are prominent at the
three main corners (click
Once everything is connected, plug in the battery
charger. You'll immediately know the process is working if you see tiny bubbles
rising from the tool. In this pic, the bubbles are prominent at the
three main corners (click 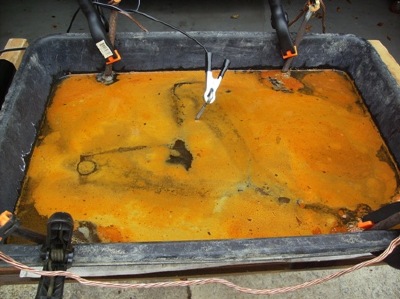 This is the result after only one hour. (Click
 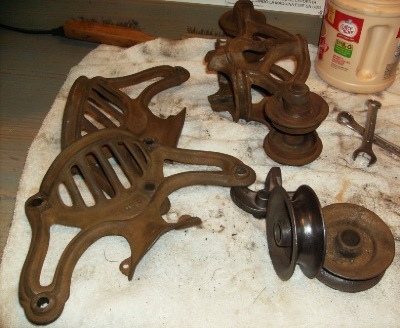 We recently cleaned up an old barn trolley using electrolysis. Because it was a fall day with virtually no humidity, we hosed down the parts afterward. The pic at left shows what they looked like. While the rust is gone, the dust from the rust remains. If you look at the two wheels in the bottom corner, you can see the difference after the rust is removed. To enlarge the pic, click
 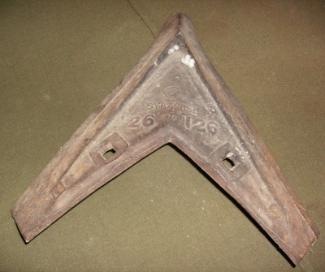 The item we used (from a plow) had a sufficient amount of rust on it, though the
 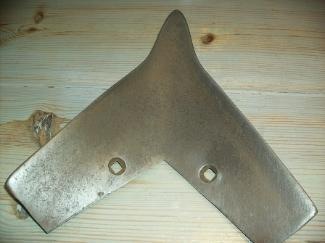 So here's the finished product, which took several hours but was
virtually effortless and a pretty neat learning experience. This is a picture of the
bottom of the tool we cleaned. It was taken immediately after being
washed down. To enlarge, click
So here's the finished product, which took several hours but was
virtually effortless and a pretty neat learning experience. This is a picture of the
bottom of the tool we cleaned. It was taken immediately after being
washed down. To enlarge, click 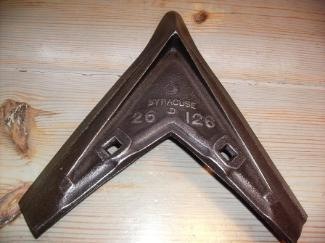 This is a top view after the item was dried and received a coat of
Howard's Feed & Wax (a great sealant/rust deterrent). Whatever your
plans, be sure you execute them as quickly as possible after completing
the process. The quicker you react, the less likely it is that rust will
form on your item. For a closer look at this pic, click
This is a top view after the item was dried and received a coat of
Howard's Feed & Wax (a great sealant/rust deterrent). Whatever your
plans, be sure you execute them as quickly as possible after completing
the process. The quicker you react, the less likely it is that rust will
form on your item. For a closer look at this pic, click