In October 2009, we decided to do something we'd put off for a long time. When we bought our house in August 2003, it came with this pitiful 6'x8' shed that was covered by brush (as was the entire back corner of the yard), and the space behind it was impassable. We cleared the overgrowth but weren't left with much. Nevertheless, as new homeowners, we had bigger fish to fry.
In 2009, we took a week off to remedy the problem. The plan was to demo the old shed and erect a new one from scratch.
We took the week of Nov. 2 off for our project. Saturday, October 31, we got the shed cleared and disassembled.
It's clear from this picture that the foundation was rotting. What's more, there were several tree branches that had grown through one side of the shed and out the other. We systematically disassembled it, starting with unscrewing all the panels and trim.
Once the panels and trim were off, the roof came off relatively easily. You might wonder what someone does with all that metal. Well, with a little determination and a pair of tin-snips, we were able to get it all into two trash cans.
We knew we had a long road ahead of us and that the demo was the easy part. Nevertheless, we felt compelled to take a picture for posterity. Soon after, Ron took to breaking down the frame and then the foundation.
Leveling the ground for the new foundation meant lots of digging, cutting tree roots, and raking. Of course, ensuring a level and solid foundation is critical, so we took our time and made sure it was done right. We started by outlining the footprint of the new shed, 10.5' x 12.5.' It was worth the time we spent getting a level foundation prepared and built.
By the end of our first day of vacation, we had the base built and a coat of Kilz around the perimeter. Although it took us three days to get to this point, we weren't discouraged. We knew that once we started on the walls, we'd get into a groove and things would go faster. We weren't far off.
When it comes to projects of any significant scale, the details are in the planning, particularly when time is an issue. In ordering supplies for our project, Ron crunched the numbers to determine what we would need. Once we got all the wood, we separated it, designating it according to its purpose (foundation, frame, trusses, etc.). That made assembling the frame go much faster. We built each wall and then erected it as a single unit.
Because the boards were divided based on their use, Ron was able to precut some of them - again, speeding up the process. Of course, when the first wall went up, we secured braces to both ends, removing the one in the back when the adjoining wall was erected. You'll notice in the pic below that two of the braces remained after the frame was up. We had checked to ensure the walls were plumb. Keeping the braces in place helped the frame remain rigid while we attached the exterior panels. By the end of our second vacation day, we had three walls up (but not without a little blood).
Prior to starting our build, we found some windows at the Nashville Flea Market that were just what we had in mind, particularly since they were just $5 a piece. Ron measured accordingly, leaving sufficient space for each window. Next, we attached the exterior. We used T1-11, an exterior-grade plywood siding with a tongue-and-groove pattern, similar to that seen in paneling.
We started with the back wall for a reason; it was the only wall without windows. Because of the grooved pattern, it was important that each sheet of plywood match the adjoining one at the appropriate point. Rather than start with a wall that contained windows and risk additional seams or even coming up short in the back, we started there first.
Attaching the walls took nearly 3 days, but by Friday, they were done. Wanting to take full advantage of our week off, we trudged on. Ron insisted on getting the ridge beam up for the roof by nightfall.
And so he did. By dusk, it was up. With the boards set aside for the trusses, we planned to make great progress Saturday, hoping to get the roof on by day's end.
The weather was certainly on our side throughout this entire project. Saturday went off without a hitch, with all the trusses and the plywood for the roof in place by the end of the day. Of course, having the right tool makes all the difference.
Sunday evening brought our vacation week to a close, and while we didn't finish, we got pretty far. Our priorities on Sunday focused on the forecast, which called for rain on Monday. With that in mind, we got tar paper on the roof and spent much of the day caulking. After that, we covered the whole thing with tarps in anticipation of rain. Going forward, we would have only weekends to finish what we'd started.
The week before undertaking this project, we prepped the windows we found at the flea market. Of course, for $5 a piece, we had to reglaze them. While they appear to be the same size, they each varied slightly. To make things easier when it came to installing them, we used soap to label each one with a letter to designate where it went in the shed.
On Saturday, we got the windows painted and the trim cut, among other things. On Sunday, Ron cut the pieces for the gable, installed nailers, and got the gable up. Once all the exterior pieces were in place, we were able to install the windows and some primary pieces of trim and caulk the interior. This is how it looked at the end of the weekend. We spent evenings after work knocking out the paint. Little did we know where that would lead.
The following weekend, Ron dedicated himself to getting the door built and erected, which he did. Meanwhile, my weeknight painting had grown into something bigger. While Ron built a door and I twiddled my thumbs, it dawned on me that it would be nice if the shed and the garage were the same color. Thus, my painting spree began.
Thanksgiving fell on Thursday that week. On Wednesday, Ron started building the overhang he had contemplated since the beginning of the project.
We took full advantage of a 5-day weekend. Ron got the overhang built,
while I worked on getting the trim painted. We took Thanksgiving day off and got the overhang and remaining trim up on Friday. We spent the rest of the weekend painting the underside of the overhang, the eaves, and the door.
We have a pretty sizable garage, so it took me until Saturday to finish painting. While it's a minor detail, I have to point out that we did install vents on the backside of the shed. I mention it because we had to purchase them twice. To this day, we've never found the first set. I honestly don't know how we lost them. It was the finishing touch to the project. To see a pic of the matching garage, click here.
Months later, we took bricks we found under the shed and used them to create skirting and an entryway. While the entire project took a total of 16 days, the entryway seemed to finally put closure to it.


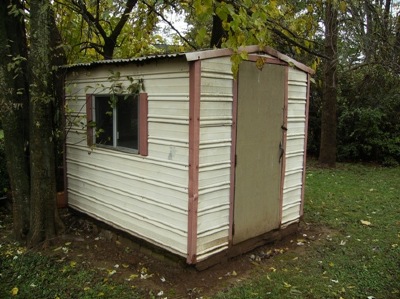 In October 2009, we decided to do something we'd put off for a long time. When we bought our house in August 2003, it came with this pitiful 6'x8' shed that was covered by
 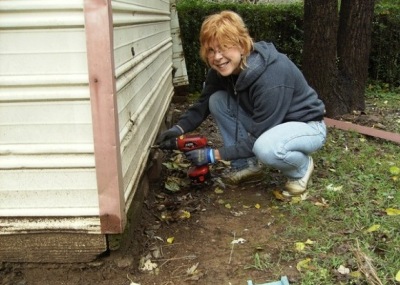 We took the week of Nov. 2 off for our project. Saturday, October 31, we got the shed cleared and disassembled.
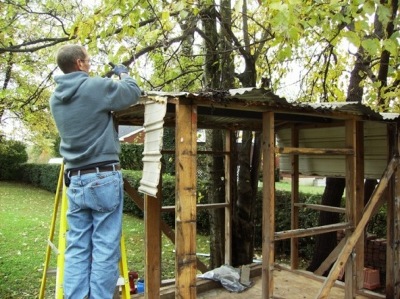 Once the panels and trim were off, the roof came off relatively easily. You might wonder what someone does with all that metal. Well, with a little determination and a pair of
  We knew we had a long road ahead of us and that the demo was the easy part. Nevertheless, we felt compelled to take a picture for posterity. Soon after, Ron took to breaking down the frame and then the
 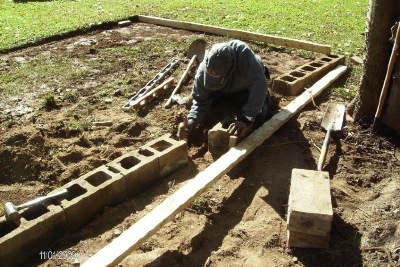 Leveling the ground for the new foundation meant lots of digging, cutting tree roots, and raking. Of course, ensuring a level and solid foundation is critical, so we took our time and made sure it was done right. We started by outlining the
  By the end of our first day of vacation, we had the base built and a coat of Kilz around the perimeter. Although it took us three days to get to this point, we weren't discouraged. We knew that once we started on the walls, we'd get into a groove and things would go faster. We weren't far off.
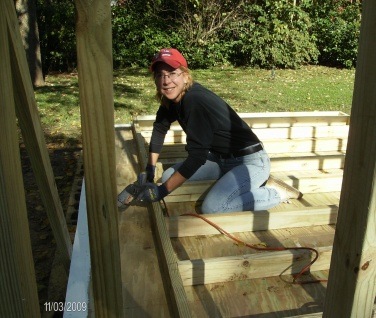 When it comes to projects of any significant scale, the details are in the planning, particularly when time is an issue. In ordering supplies for our project, Ron crunched the numbers to determine what we would need. Once we got all the wood, we separated it, designating it according to its purpose (foundation, frame, trusses, etc.). That made assembling the frame go much faster. We built each wall and then erected it as a single unit.
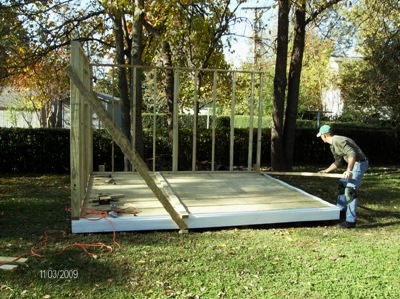 Because the boards were divided based on their use, Ron was able to precut some of them - again, speeding up the process. Of course, when the first wall went up, we secured braces to both ends, removing the one in the back when the adjoining wall was erected. You'll notice in the pic below that two of the braces remained after the frame was up. We had checked to ensure the walls were plumb. Keeping the braces in place helped the frame remain rigid while we attached the exterior panels. By the end of our second vacation day, we had three walls up (but not without a little
 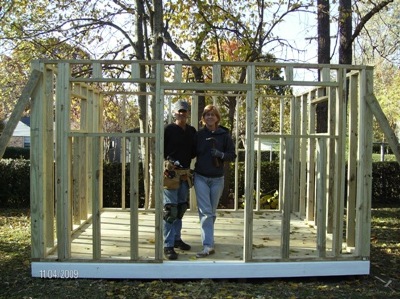 Prior to starting our build, we found some windows at the Nashville Flea Market that were just what we had in mind, particularly since they were just $5 a piece. Ron measured accordingly, leaving sufficient space for each window. Next, we attached the exterior. We used
 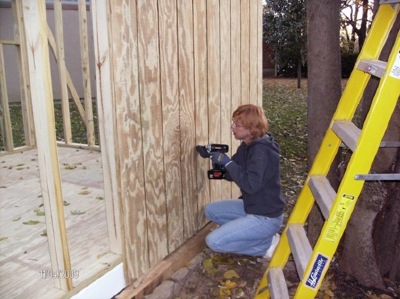 We started with the back wall for a reason; it was the only wall without windows. Because of the grooved pattern, it was important that each sheet of plywood match the adjoining one at the appropriate point. Rather than start with a wall that contained windows and risk additional seams or even coming up short in the back, we started there first.
 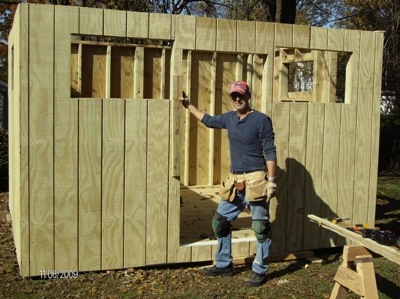 Attaching the walls took nearly 3 days, but by Friday, they were done. Wanting to take full advantage of our week off, we trudged on. Ron insisted on getting the ridge beam up for the roof by nightfall.
 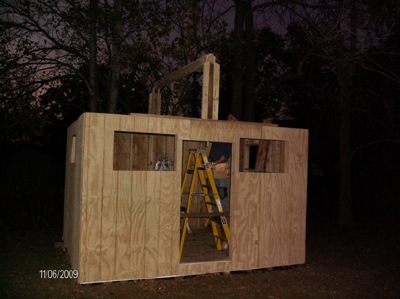 And so he did. By dusk, it was up. With the boards set aside for the trusses, we planned to make great progress Saturday, hoping to get the roof on by day's end.
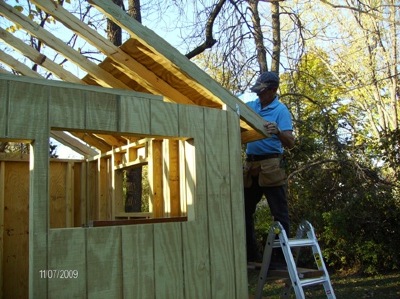 The weather was certainly on our side throughout this entire project. Saturday went off without a hitch, with all the trusses and the plywood for the roof in place by the end of the day. Of course, having the
 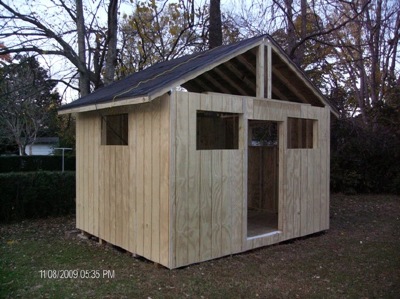 Sunday evening brought our vacation week to a close, and while we didn't finish, we got pretty far. Our priorities on Sunday focused on the forecast, which called for rain on Monday. With that in mind, we got tar paper on the roof and spent much of the day caulking. After that, we covered the whole thing with
 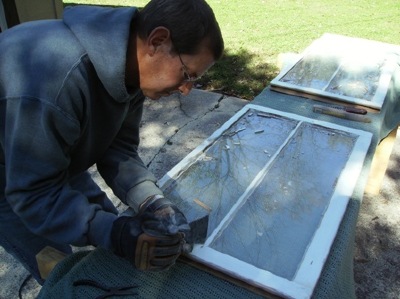 The week before undertaking this project, we prepped the windows we found at the flea market. Of course, for $5 a piece, we had to reglaze them. While they appear to be the same size, they each varied slightly. To make things easier when it came to installing them, we used soap to
 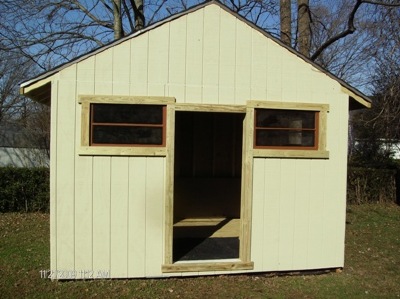 On Saturday, we got the windows painted and the trim cut, among other things. On Sunday, Ron cut the pieces for the
 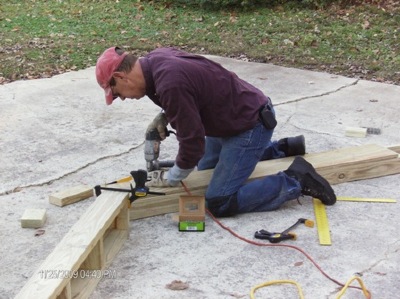 The following weekend, Ron dedicated himself to getting the
 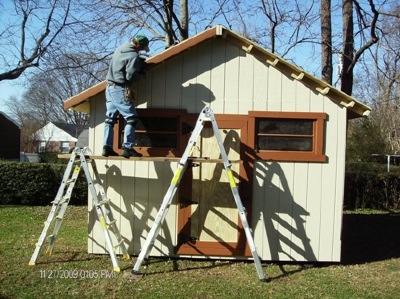 We took full advantage of a 5-day weekend. Ron got the overhang built,
while I worked on getting the
We took full advantage of a 5-day weekend. Ron got the overhang built,
while I worked on getting the 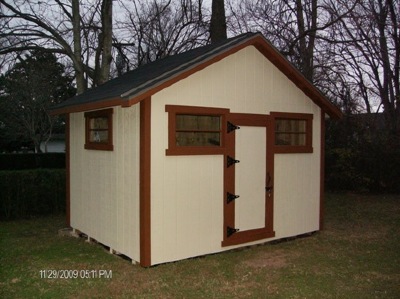 We have a pretty sizable garage, so it took me until Saturday to finish
 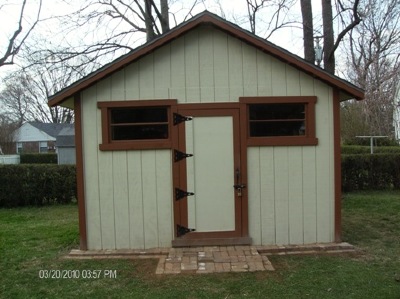 Months later, we took bricks we found under the shed and used them to create skirting and an