This is what the table looked like when we first spotted it at a yard sale. We were looking for a project and were on the bubble about buying it. We thought the price (which was marked in chalk) was $20. When we learned it was only $2, it was a no-brainer. Of course, as is so often the case, we ended up sinking much more than that into it.
The first step was disassembling the table to see what kind of shape it was in. We knew there probably wasn't much hope for the top, but we were pleasantly surprised after taking the rest of it apart. Overall, it was in pretty good shape. This is the underside of the table, with the drawer shown in the middle. This picture was taken after we'd sanded.
This is the base after sanding. Because there were so few flat surfaces (and so many nooks, crannies, and ridges), we had no choice but to sand it all by hand.
The table's top was beyond repair. It was badly marred and the boards were uneven. Our vision was to use the table in the house as a finished piece of furniture. For that reason, we decided to build a new top.
We wanted a hardwood that would complement the rest of the table, so we went with walnut. We couldn't find a piece large enough, so we glued two pieces together. Because we wanted a truly "finished" look, we used wooden pegs to assemble them. Using wooden pegs or dowels eliminates the need for screws and creates a smooth seam when done correctly.
Here, Ron gets ready for the glue-up. After applying glue (along the boards and in the holes), the pegs are inserted and the boards are pressed together.
Before the glue-up, we marked a circle on the board. The chances of creating an accurate circle - or any shape, for that matter - are much improved when you glue the pieces together first. Additionally, flat surfaces are easier to clamp together. After the glue dried, we cut out the circle and sanded it to smooth out the seam and remove the excess glue.
After sanding, we reassembled the table, applied a coat of stain, and added a new drawer pull. We're big believers in polyurethane, not only for its protective qualities, but also for the finish it provides. On wood projects, we often apply multiple coats. For a high shine, like the one achieved here, we applied five or six coats. Taking steel wool to the surface after the poly dries creates a smoother finish. We steel-wooled after the second, fourth, and final coats. For a bigger and better view of the final product, click here.


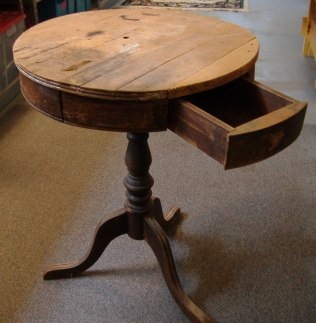 This is what the table looked like when we first spotted it at a yard sale. We were looking for a project and were on the bubble about buying it. We thought the price (which was marked in chalk) was $20. When we learned it was only $2, it was a no-brainer. Of course, as is so often the case, we ended up sinking much more than that into it.
 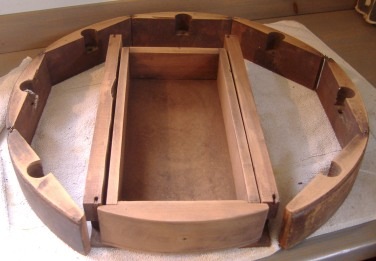 The first step was disassembling the table to see what kind of shape it was in. We knew there probably wasn't much hope for the top, but we were pleasantly surprised after taking the rest of it apart. Overall, it was in pretty good shape. This is the underside of the table, with the drawer shown in the middle. This picture was taken after we'd sanded.
 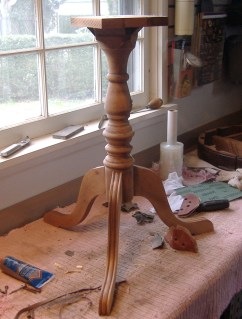 This is the base after sanding. Because there were so few flat surfaces (and so many nooks, crannies, and ridges), we had no choice but to sand it all by hand.
 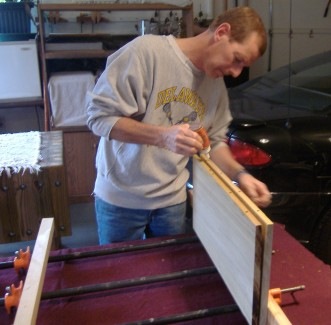 The table's top was beyond repair. It was badly marred and the boards were uneven. Our vision was to use the table in the house as a finished piece of furniture. For that reason, we decided to build a new top.
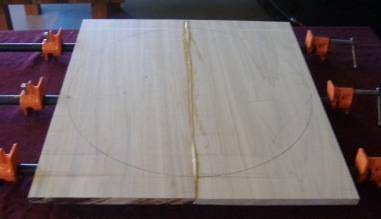 Before the glue-up, we marked a circle on the board. The chances of creating an accurate circle - or any shape, for that matter - are much improved when you glue the pieces together first. Additionally, flat surfaces are easier to clamp together. After the glue dried, we cut out the circle and sanded it to smooth out the seam and remove the excess glue.
 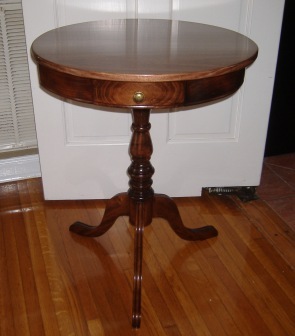 After sanding, we reassembled the table, applied a coat of stain, and added a new drawer pull. We're big believers in polyurethane, not only for its protective qualities, but also for the finish it provides. On wood projects, we often apply multiple coats. For a high shine, like the one achieved here, we applied five or six coats. Taking steel wool to the surface after the poly dries creates a smoother finish. We steel-wooled after the second, fourth, and final coats. For a bigger and better view of the final product, click