This press was beyond belief when we first saw it. It was outside and covered with condensation when we purchased it. No doubt, it had seen its share of the outdoors. Disassembling it was a task in itself and required great care. We had to be careful not to break any nuts or strip any threads. A degreaser is helpful if you're ever charged with a similar task.
There's not a lot to tell as far as the process goes - unless you count the multiple ways to remove rust. We started with a wire wheel on the end of a drill. Not knowing exactly what would be required, we started on the underside of the base. The narrow rows and numerous corners made the task more difficult than we thought it would be - and limited the tools we could use.
After tackling the bottom of the base, we were ready to move to the top - and a nice flat surface. We started with the underside of the actual press. We were soon faced with deciding how much rust (and paint) we were going to remove. It actually would have been easier to take it down to bare metal, removing the rust and all the paint with it, but that's not what we do. We're not big into converting old tools into new ones. We prefer to restore an item to the condition it was in when it was in use. For that reason, we opted to remove the rust and retain as much of the original paint as possible. Nevertheless, there was enough rust that we were able to start with a palm sander.
While the palm sander was ideal for the flat surfaces, it wasn't much use on the corners and sides. For those, we went back to a brass wheel and drill.
We were able to remove a lot of rust by using a palm sander, a wire wheel, and good old-fashioned elbow grease. In an effort to retain as much of the original paint as possible, we opted for a lighter medium to remove the balance of the rust. Steel wool was the answer. As with each step in the process of restoring this press, it was slow and tedious.
The threaded "throat" wasn't painted. That gave us more leeway in removing the rust.
Being purists at heart, we faced a real dilemma when it came to finishing the painted surfaces. We didn't want to repaint them. There was a sheen to the original finish - one that would have involved adding a coat of lacquer or poly if we chose to repaint it. Additionally, there were graphics on the base of the wheel that we knew we wouldn't be able to duplicate.
We put our heads together and decided to blue the surface - as in gun blue. You can pick it up at most sporting goods stores. We found some at a local Army surplus store.
The process is simple but time-sensitive. You must work quickly to do it
properly. We set up a crude assembly line and got started. After each
application (it took multiple coats), we let the item sit for 5 minutes,
wiped it down with a damp cloth, dried, and reapplied.
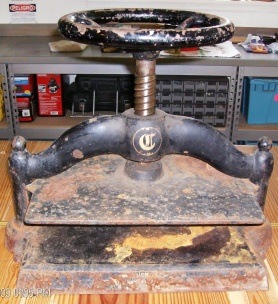
This the press as it sits in our home today. There are some blotchy areas on the front of the base. As it turns out, there were actual bits of paper with the name of the manufacturer on it. There wasn't enough for us to make a positive ID, but we couldn't bring ourselves to remove it.


 This press was beyond belief when we first saw it. It was outside and covered with condensation when we purchased it. No doubt, it had seen its share of the outdoors. Disassembling it was a task in itself and required great care. We had to be careful not to break any nuts or strip any threads. A degreaser is helpful if you're ever charged with a similar task.
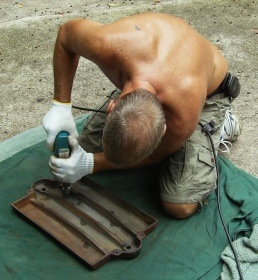 There's not a lot to tell as far as the process goes - unless you count the multiple ways to remove rust. We started with a wire wheel on the end of a drill. Not knowing exactly what would be required, we started on the underside of the base. The narrow rows and numerous corners made the task more difficult than we thought it would be - and limited the tools we could use.
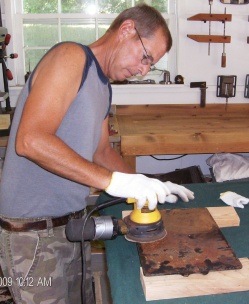 After tackling the bottom of the base, we were ready to move to the top - and a nice flat surface. We started with the underside of the actual press. We were soon faced with deciding how much rust (and paint) we were going to remove. It actually would have been easier to take it down to bare metal, removing the rust and all the paint with it, but that's not what we do. We're not big into converting old tools into new ones. We prefer to restore an item to the condition it was in when it was in use. For that reason, we opted to remove the rust and retain as much of the original paint as possible. Nevertheless, there was enough rust that we were able to start with a palm sander.
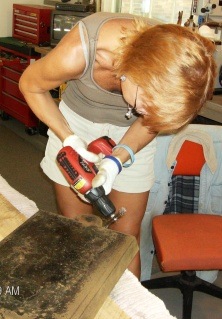 While the palm sander was ideal for the flat surfaces, it wasn't much use on the corners and sides. For those, we went back to a brass wheel and drill.
 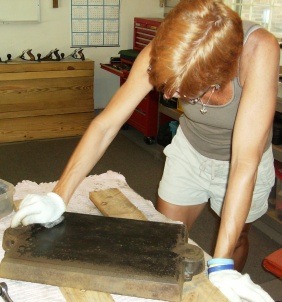 We were able to remove a lot of rust by using a palm sander, a wire wheel, and good old-fashioned elbow grease. In an effort to retain as much of the original paint as possible, we opted for a lighter medium to remove the balance of the rust. Steel wool was the answer. As with each step in the process of restoring this press, it was slow and tedious.
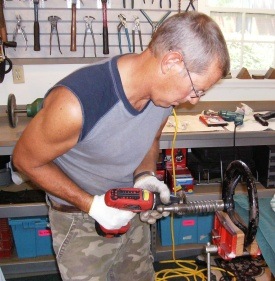 The threaded "throat" wasn't painted. That gave us more leeway in removing the rust.
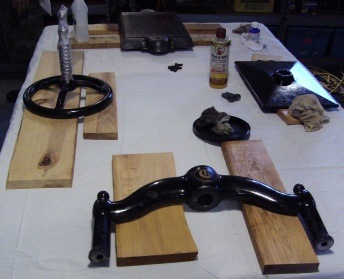 Being purists at heart, we faced a real dilemma when it came to finishing the painted surfaces. We didn't want to repaint them. There was a sheen to the original finish - one that would have involved adding a coat of lacquer or poly if we chose to repaint it. Additionally, there were graphics on the base of the wheel that we knew we wouldn't be able to duplicate.
 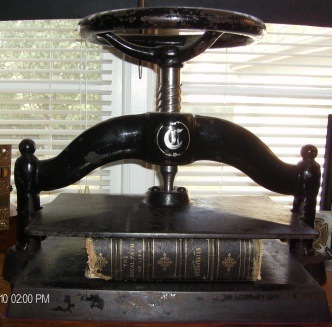 This the press as it sits in our home today. There are some blotchy areas on the front of the base. As it turns out, there were actual bits of paper with the name of the manufacturer on it. There wasn't enough for us to make a positive ID, but we couldn't bring ourselves to remove it.